Using self-hosted Umami for iOS app analytics
Part 2 of 5 in the series Self-hosted Umami:
Since I already self-host Umami, I wanted the same experience for my apps without a heavyweight analytics SDK, an IDFA prompt, or a third party collecting data on my behalf. I created a small open source Swift package to achieve this: umami-swift. This gives me the same visitor and visit numbers as the sites, in the same dashboard.
My Umami-instance now has apps too
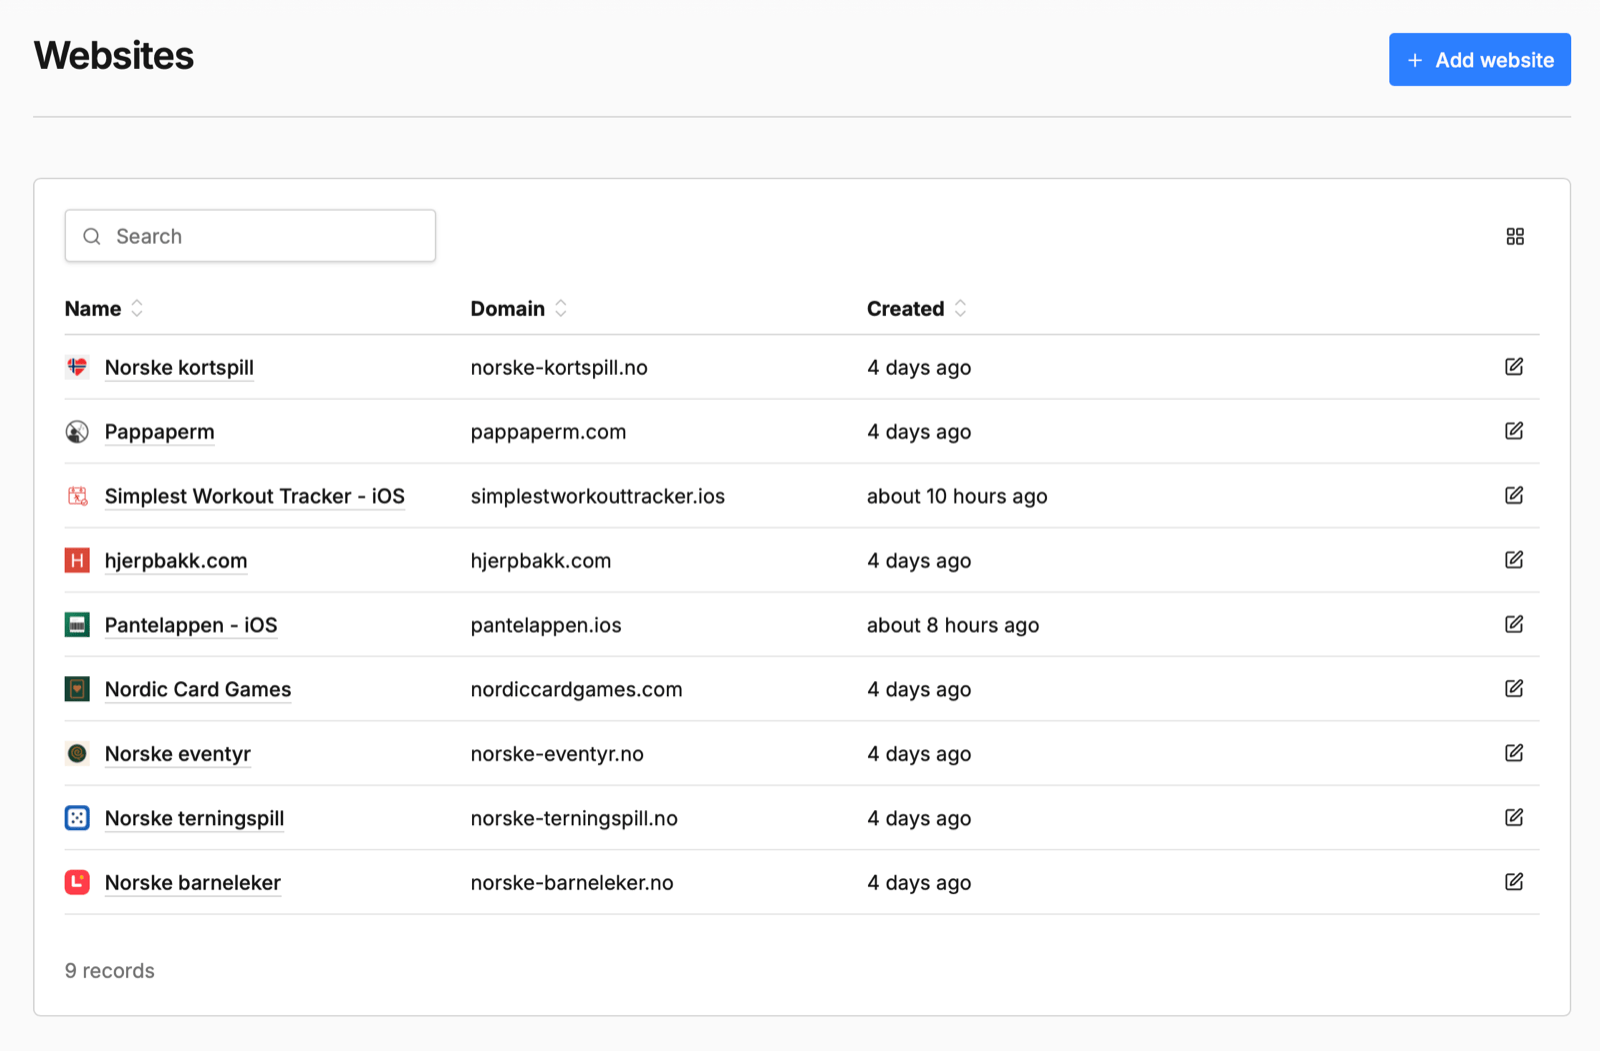
Every app is registered in Umami as a website and shows up in the websites list next to the actual websites, real app icon included:
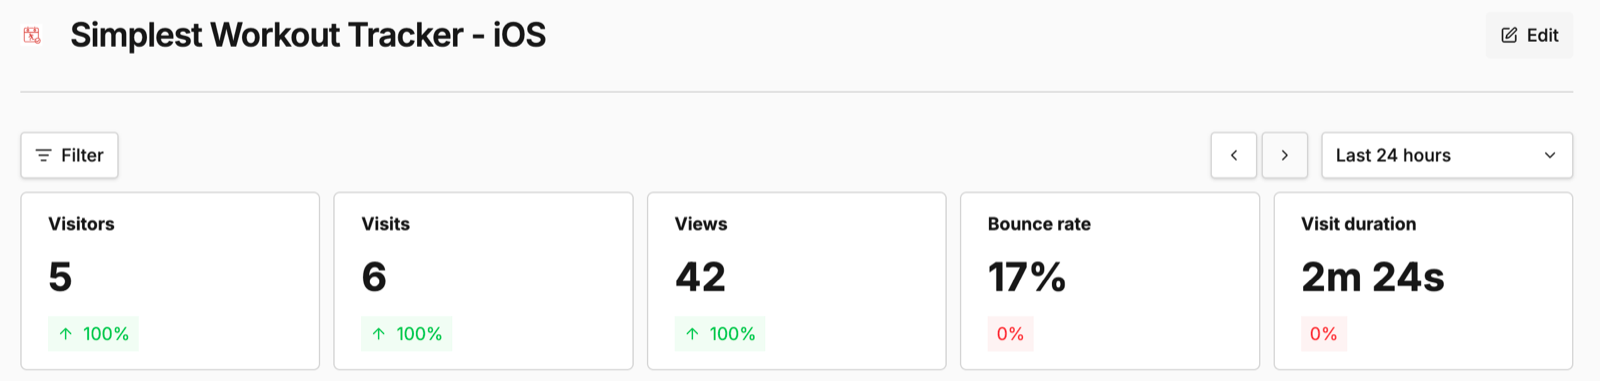
An app’s overview reads exactly like a website’s, with visitors, visits, and views counted the same way:
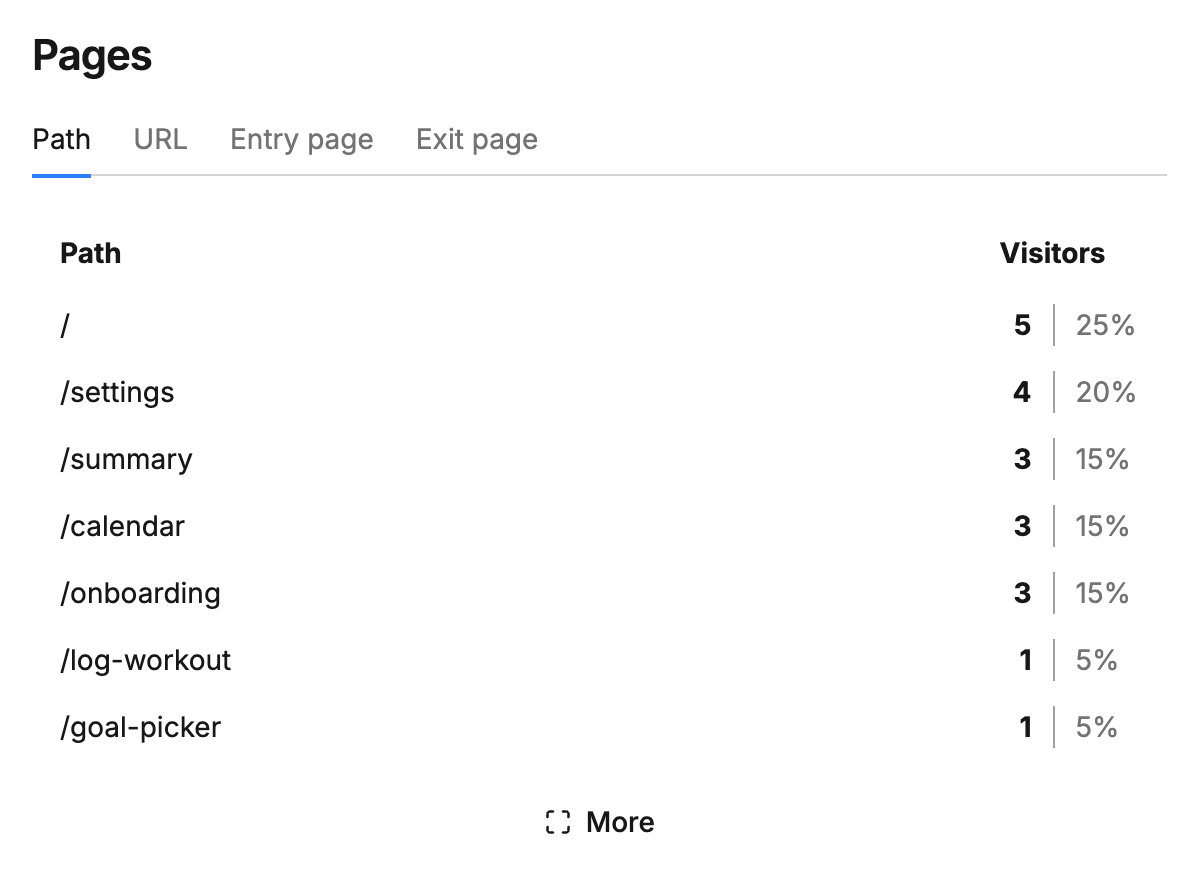
An app’s screens report themselves as pages. In my workout tracker, Simplest Workout Trakcer, the calendar, the annual summary, the settings sheet, and the log workout sheet each show up, so the pages list shows which parts of the app people actually use:
How it was done
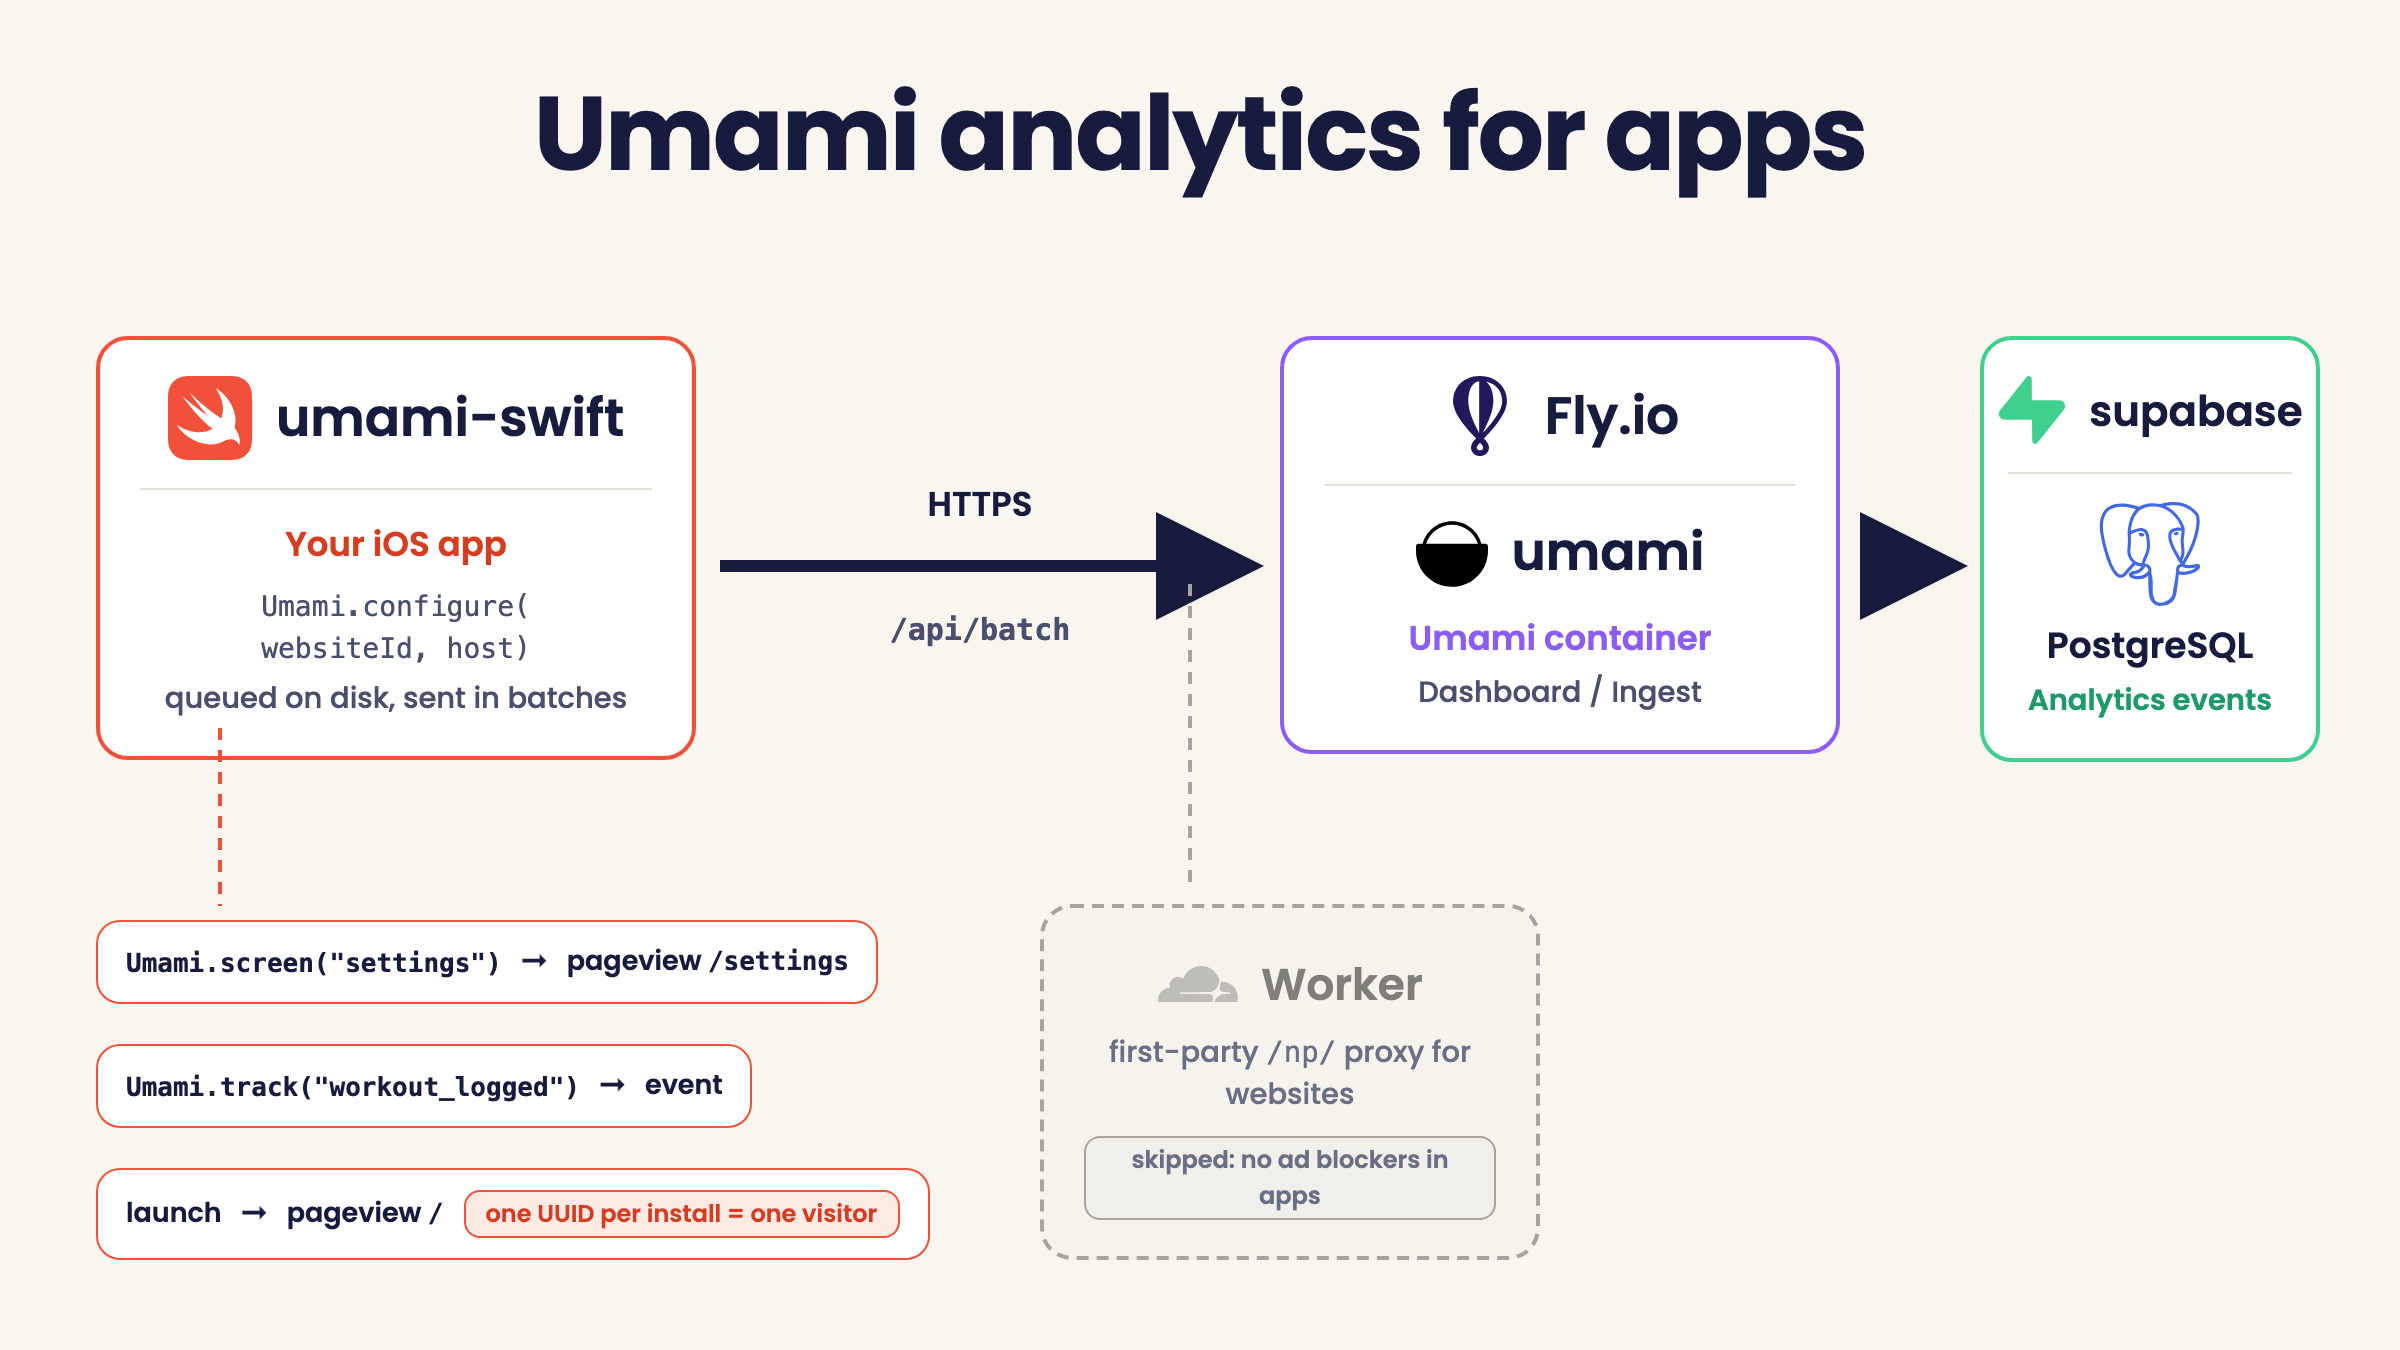
umami-swift is an open source Swift package with no dependencies of its own. The public API is deliberately small:
import Umami

// At launch:
Umami.configure(
    websiteId: "your-website-id",
    host: "cardgame.ios",
    baseURL: URL(string: "https://your-umami-host")!
)

// Anywhere:
Umami.track("game_started")
Umami.track("level_completed", ["level": 7, "won": true])

// When the user moves to another screen:
Umami.screen("settings")

// Opt-out:
Umami.setEnabled(false)
configure takes the website id and a host string. The host is the domain you enter when adding the website in Umami; apps have no real domain, so I use a pseudo-domain like simplestworkouttracker.ios. baseURL is for me set to https://hjerpbakk-analytics.fly.dev, the Fly machine from the previous post. Anyone else running Umami points it at their own instance. Configuring also queues the launch pageview and the app_started event, so a launch shows up in Umami, Overview included, with no further code.
track sends a named event with an optional dictionary of extra data. screen sends a pageview for a named screen. Both queue to disk and send in batches, so a launch without network loses nothing, and the UI never waits for analytics.
Adding it to an app
Adding it to your own app takes a few steps:
- In Xcode, choose File → Add Package Dependencies, paste
https://github.com/hjerpbakk/umami-swift, set the rule to Up to Next Major Version from1.3.0, and add theUmamiproduct to your app target. For aPackage.swiftproject, add.package(url: "https://github.com/hjerpbakk/umami-swift", from: "1.3.0")todependenciesand theUmamiproduct to your target. - In your Umami dashboard, add a new website for the app. Apps have no real domain, so give it a stable pseudo-domain like
myapp.iosand copy the website id it generates. -
Call
Umami.configureonce at launch, from your app’sinit(orapplication(_:didFinishLaunchingWithOptions:)). Pass the website id, the same domain you entered in Umami ashost, and your own Umami instance asbaseURL:Umami.configure( websiteId: "<your-website-id>", host: "myapp.ios", baseURL: URL(string: "https://your-umami-host")! ) - Run the app and open its website in your Umami dashboard. The
app_startedevent should appear within a few seconds, tagged with a visitor id, confirming events are flowing.
That’s the whole integration.
The rest of this post is the details of how it all works.
A different client for the same backend
Umami’s tracking script talks to two endpoints: /api/send for a single event and /api/batch for several at once. Both take a JSON body, and neither asks for an API key or a signed request. Umami identifies a website by the website-id in the payload, not by who sent it.
So a Swift app can call the same endpoints directly, without a browser or a script tag. It sends the same shape of JSON the tracking script would have produced, with a User-Agent that doesn’t trip Umami’s bot filter. The honeypot from the previous post applies to apps too: a request that looks like a bot gets a 200 back, and the hit never shows up in the dashboard.
Getting unique users right
Umami counts traffic in two units: visitors and visits. A visitor is an identity that persists across visits, a visit is one session. On the web, Umami computes the visitor from a cookieless hash of IP and User-Agent. An app has no browser session to hash, so umami-swift supplies the visitor id itself: every event carries a payload.id, a UUID that Umami accepts as an already-computed visitor identifier.
That UUID is random, lives only in memory, and rotates when the calendar day changes. Nothing is written to the device, so there is no id to read back and usage on different days can’t be linked. Because the id dies with the process, each launch in practice counts as a new visitor, with a day as the ceiling rather than the typical lifetime. This keeps the app on the same footing as Umami’s cookieless web tracking, where a visitor is a rotating server-side hash and not a stored identifier. Nothing here touches IDFA or App Tracking Transparency, and the id can’t follow anyone across apps, installs, or days.
Pageviews make the Overview work
Umami computes visitors, visits, and views from pageviews. A payload with a name is a custom event, not a pageview, so named events on their own leave the Overview at zero and show up only under Events.
So the client sends a pageview for / on every launch and every return to the foreground. On the wire it’s nearly the same payload as the app_started event next to it, the pageview just has no name. That gives the Overview real numbers: one view per launch, with visits and visitors counted the same way as for my websites.
Screens can opt in too. Umami.screen("settings") sends a pageview for /settings, and the screen appears in Umami’s pages list like a page on a website. That is what fills the pages list shown earlier in the post.
No ad blockers in the way
Much of the previous post dealt with the Cloudflare /np/ path, because a browser routes every request through whatever ad blocker or privacy extension the visitor has installed. There the blocker sees the full URL, so block lists like EasyPrivacy match Umami’s usual hostnames and script paths. That is what the /np/ path sidesteps.
An app is harder to block. Safari content blockers, the common kind on iOS, only apply inside Safari and never see a native app’s traffic. A system-wide blocker like 1Blocker’s Firewall, or a DNS blocker like NextDNS or AdGuard, is different: it runs as an on-device VPN or resolver and does sit between the app and the network. But it only sees the domain, from the DNS lookup and the server name in the TLS handshake. The path stays inside the encrypted request, so the path and script-name rules that catch Umami in a browser have nothing to match, and all that is left is the hostname. A self-hosted instance on an unremarkable domain like hjerpbakk-analytics.fly.dev is on no block list, so the request goes through. Add that exact domain to a custom list by hand and it would stop, but nothing does so on its own.
So umami-swift talks straight to the Fly origin instead of going through the Cloudflare Worker. The /np/ proxy still does its job for the websites, but the apps skip it. It still has its role though, as you will see now.
Showing app icons in Umami
Umami shows a small icon next to each website in the dashboard, fetched from DuckDuckGo’s favicon service based on the registered domain. That works for actual websites. My apps are registered under pseudo-domains like simplestworkouttracker.ios, which no favicon service can resolve, so every app got the same gray globe.
Self-hosting means I can change this. Umami reads a FAVICON_URL environment variable that swaps the favicon service for any URL template with a {{domain}} placeholder. Mine points at the Cloudflare Worker from the previous post:
FAVICON_URL=https://hjerpbakk.com/icons/{{domain}}
So the apps skip the Worker for tracking, but it ended up doing one small job for them anyway. When asked for /icons/<domain>, it checks the domain against a list of my apps. A match returns the app’s real icon, a 48x48 PNG embedded in the Worker itself (the dashboard renders it at 16 points, so 48 covers a 3x display). Everything else is redirected to DuckDuckGo’s favicon service, and the websites keep the favicons they already had. A small script resizes an app’s 1024 pixel icon and embeds it, so adding an icon for the next app is one command.
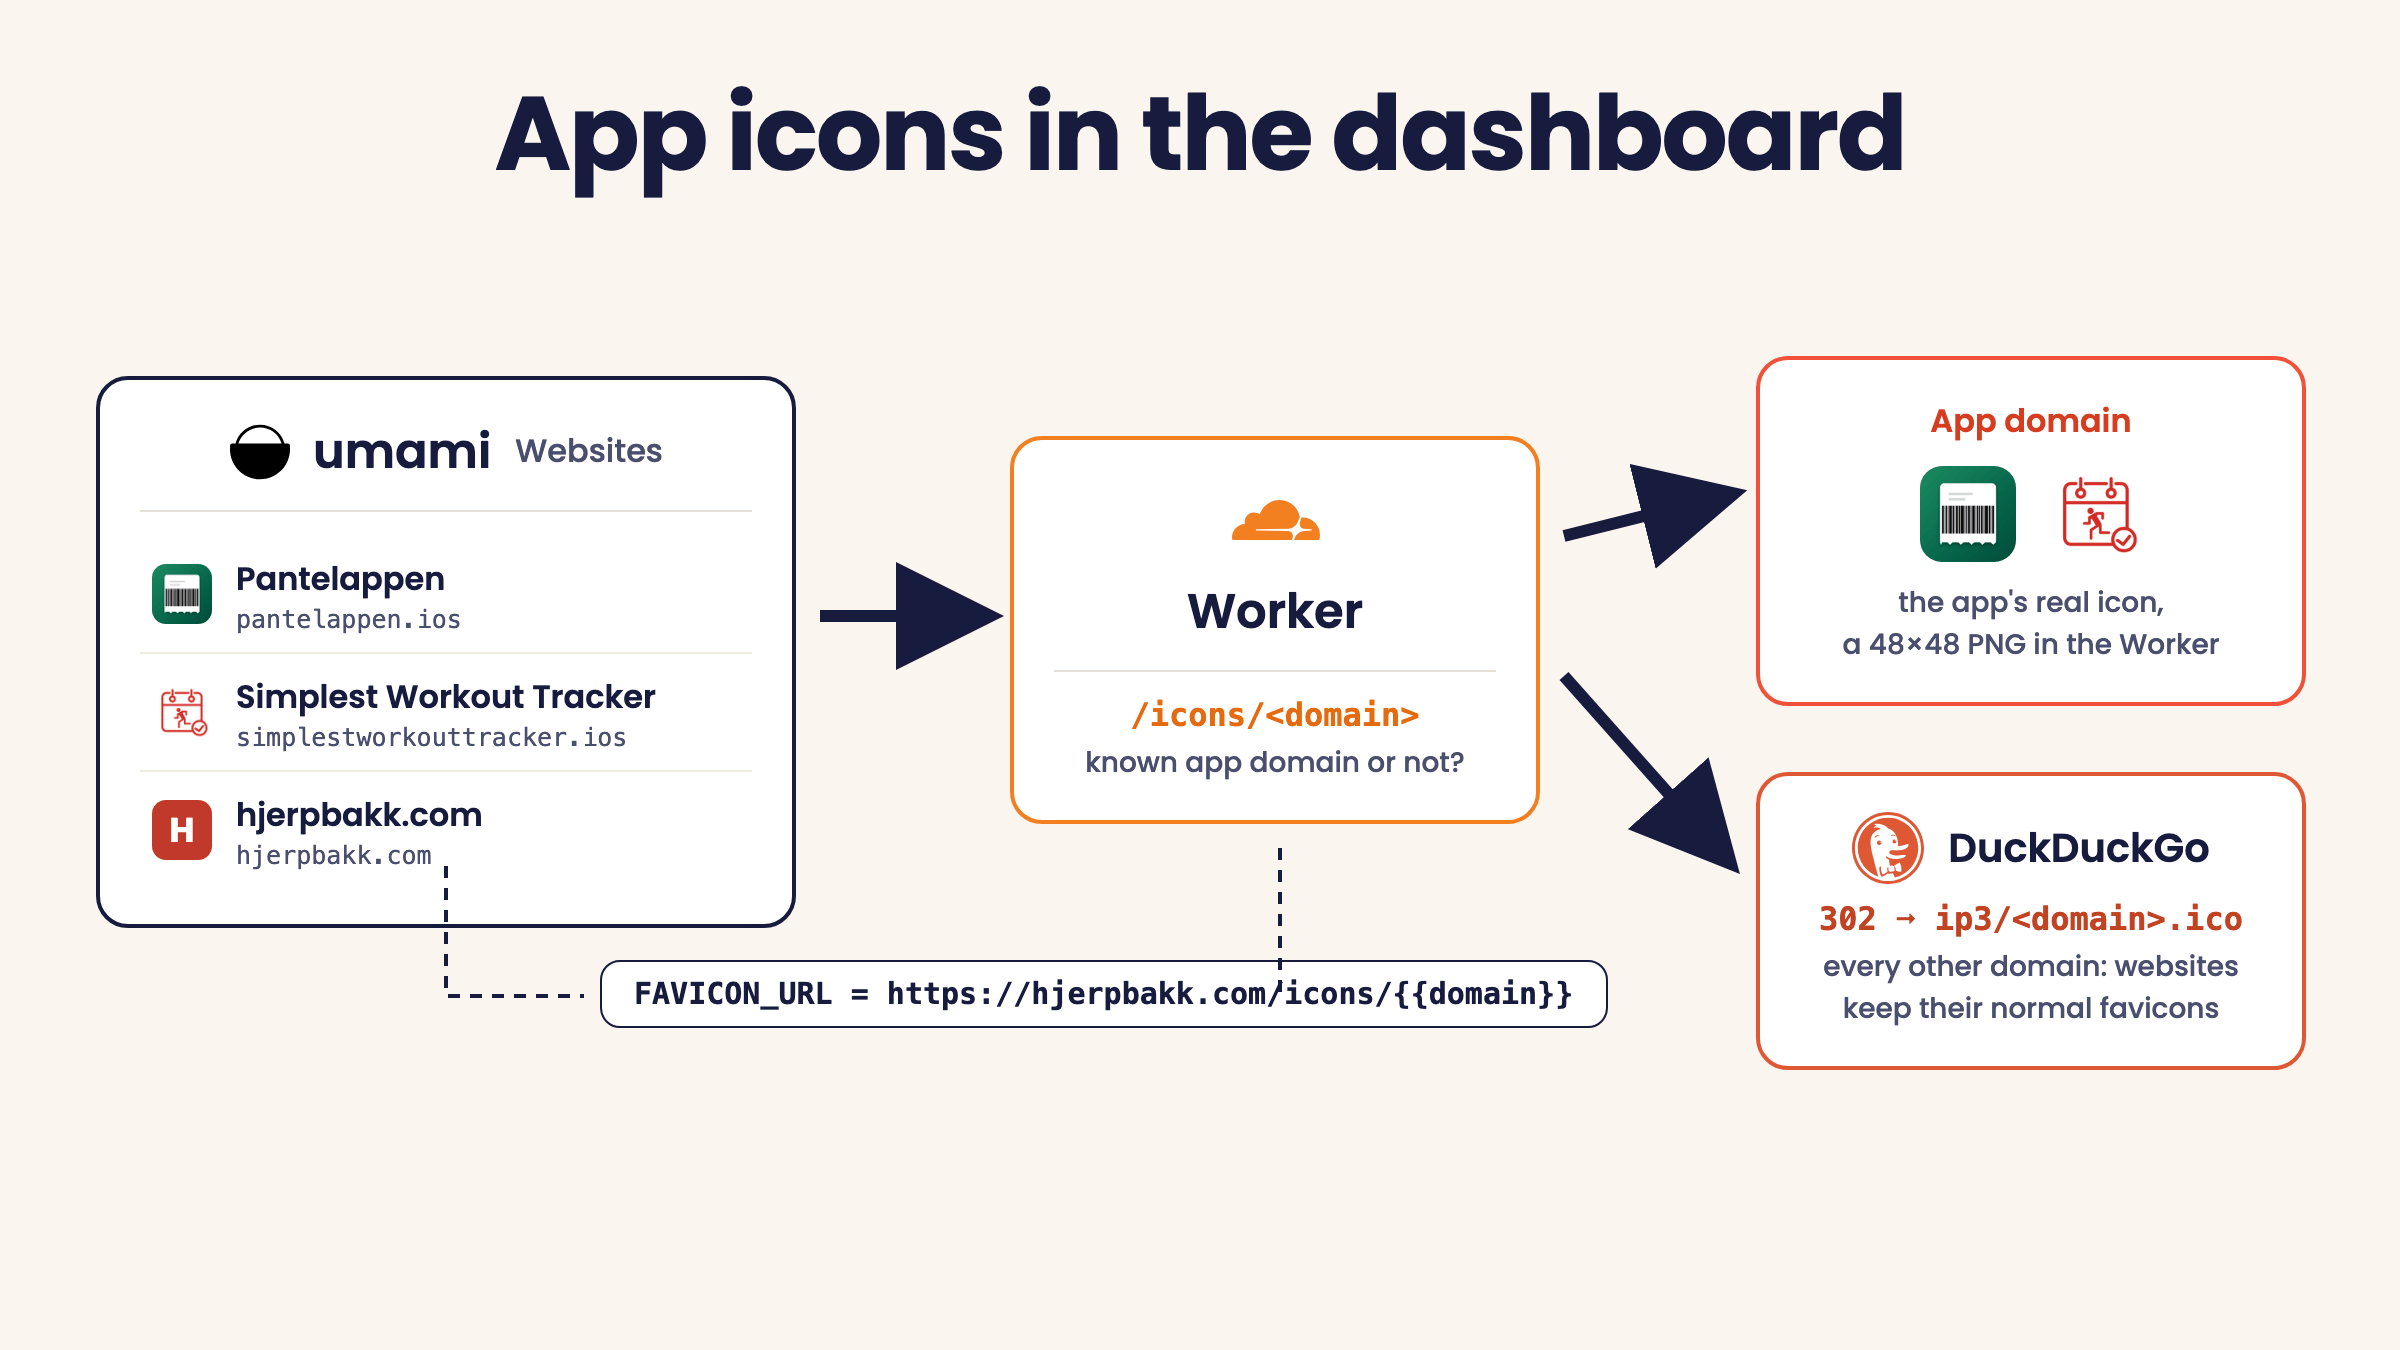
Purely cosmetic, but the websites list is the first thing I see when I open the dashboard, and as the first screenshot shows, the apps now have their actual icons instead of placeholders.
Part 2 of 5 in the series Self-hosted Umami: